Docker for newbies 🐳
Install Docker if you haven’t already and follow along for a gentle introduction to the world of containers ✨🗳 We’ll be using this FastAPI project for demonstration purposes but the principles will apply to most applications.
Why do we use Docker?
There’s two fundamental reasons why teams use Docker:
- Creating reproducible development and production environments — chances are that in a team not everyone will use the exact same machine and/or OS e.g. some of us might use Windows, Mac or Linux, we might use different MacBook models etc. Because of these differences, it is hard to guarantee that our application will behave exactly the same when run locally e.g. some dependencies might be incompatible in a particular machine. Docker solves this problem, by “simulating” a machine with some specific properties (memory, OS…).
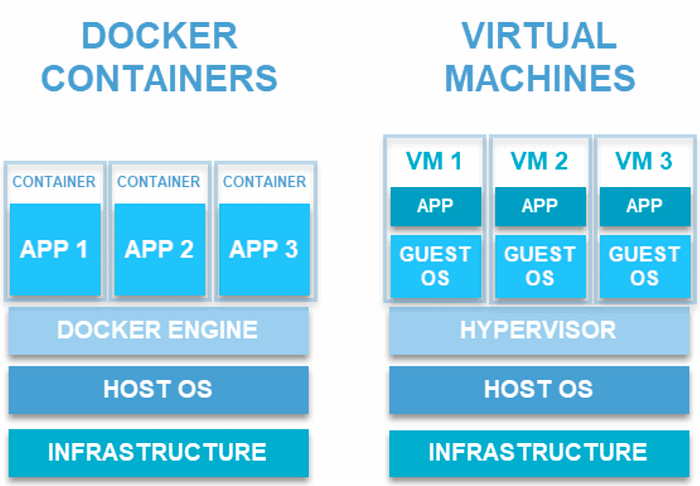
- Deploying containers is more efficient than deploying virtual machines — before Docker was around, teams would typically deploy instances of their applications in so called “virtual machines”. Docker instead, creates “containers” which share some of the resources such as the OS among each other.
Images & Containers:
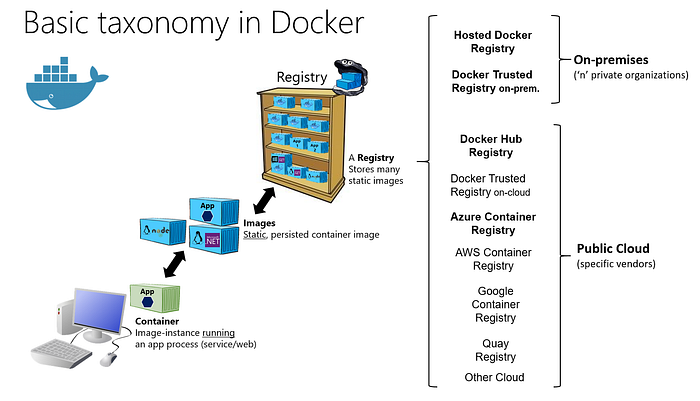
So what is actually going on when we use Docker? Docker allows us to create running instances of our applications, called “containers”. Containers are created based on images, which are defined in Dockerfiles. You can think of these like classes and objects in OOP languages.
Image (class) → Container (instance)An image is first built and a container can then run based on that image. If a change is added to an image, it must first be re-built for the changes to be applied next time a container is run.
In the following Dockerfile, we use the FROM statement to build our image on top of the python:3.9-slim-bullseye base image, which uses the Debian linux distribution:
FROM python:3.9-slim-bullseye

ENV PYTHONDONTWRITEBYTECODE 1
ENV PYTHONUNBUFFERED 1

WORKDIR /code

COPY requirements.txt /code/
RUN pip install -r /code/requirements.txt

COPY /scripts/install-wait-for-it.sh .
RUN /bin/sh install-wait-for-it.sh

COPY . /code

ENV PYTHONPATH "${PYTHONPATH}:/code"

EXPOSE 8000

CMD bash -c "alembic upgrade head && uvicorn app.main:app --host 0.0.0.0 --port $PORT --reload"
Again, this is pretty similar to class inheritance in an OOP language. When we run this image, our code will behave as if it was running in a Debian Linux machine. As a result, this also guarantees that our application will behave the same when deployed to production (since it will also run as a Docker container). In addition, we install our requirements, expose port 8000 and execute a command for running our migrations using alembic (in order to create our database tables) and also to run our backend server.
Deployment:
When changes are deployed, we usually push images to a storage entity called a registry. Depending on our cloud provider, this might be GCR (Google) or AWS Container Registry (Amazon) among others. Often, teams will use an additional tool called Kubernetes to manage the deployment and behaviour of Docker containers in an entity called a Kubernetes cluster.
Docker Compose:
Most applications will require multiple Docker containers instead of just one. Docker-compose allows us to define and run many containers inside a single network. We can also define dependencies. This is what a docker-compose.yml file is for. Here we define containers under the services section. Notice how the backend container depends on the database container. This is because our API requires a database server running in the background. In the example we have defined an additional container for running our test suite. In addition, docker-compose makes it easier to define volumes (a type of persistence), ports or environment variables.
version: "3.9"
services:
  db:
    container_name: db
    image: postgres:13.3-alpine
    env_file:
      - .env
    volumes:
      - ./config/postgresql.conf:/etc/postgresql.conf
    ports:
      - "5432:5432"
    command: postgres -c config_file=/etc/postgresql.conf

  backend:
    container_name: backend
    build: .
    env_file:
      - .env
    volumes:
      - .:/code
    ports:
      - "8000:8000"
    depends_on:
      - db
    restart: always

  python_test:
    container_name: tests
    build: .
    profiles:
      - python_test
    env_file:
      - .env
    volumes:
      - .:/code
    restart: always
    command:
    - pytest
*Make sure you have the latest docker-compose version installed on your system. This docker-compose file makes use of profiles which are not available in previous versions. Profiles are used here so that the python_test container is not run when we execute docker-compose up. Instead we want to run this container explicitly as we will see below.
Basic Commands
Pull an image from docker registry
docker pull image_nameBuild an image from a dockerfile
docker build docker_file_nameRun a container (will pull and build if image is not found)
docker run image_nameRun a command on a running container
docker exec container_name or container_id command_nameList all built images
docker images
(notice the size and creation date of each image)List all running containers
docker psRun all containers defined as services in docker-compose.yml
docker-compose up
(The images are built the first time we run this)Check container logs
docker logs container_name or container_idStop all running containers
docker-compose down
Introducing the Makefile
Sometimes it might be convenient to chain some of these commands during the development process (stop all running containers, build the images again, run all containers with the new images, migrate the database so that our tables are created…etc.) One way of achieving this is using a Makefile. We can define new commands based on all these smaller actions. Here’s an example:
start: ## Start project containers defined in docker-compose
   docker-compose up -d

stop: ## Stop project containers defined in docker-compose
   docker-compose stop

destroy: ## Destroy all project containers
   docker-compose down -v --rmi local --remove-orphans

clean:  ## Delete all volumes, networks, images & cache
   docker system prune -a --volumes

test: recreate ## Run tests and generate coverage report
   docker-compose build python_test
   docker-compose run python_test


recreate: destroy start ## Destroy project containers and start them again
With make test, we stop all running containers, rebuild their images, run the containers again with any new changes and run our test suite.
*The make command is a unix tool for running Makefiles and is not available on Windows. There’s a few workarounds such as using NMAKE.
Bringing everything together
Clone the example repository if you haven’t already and try running docker-compose up -d and then docker ps. You can then visit the API docs at http://localhost:8000/docs. This request will in turn show up in the backend logs, which you can check with docker logs backend. The output will look something like the following:
INFO:     Will watch for changes in these directories: ['/code']
INFO:     Uvicorn running on http://0.0.0.0:8000 (Press CTRL+C to quit)
INFO:     Started reloader process [8] using watchgod
INFO:     Started server process [10]
INFO:     Waiting for application startup.
INFO:     Application startup complete.
INFO:     172.20.0.1:58780 - "GET /docs HTTP/1.1" 200 OK
INFO:     172.20.0.1:58780 - "GET /openapi.json HTTP/1.1" 200 OK
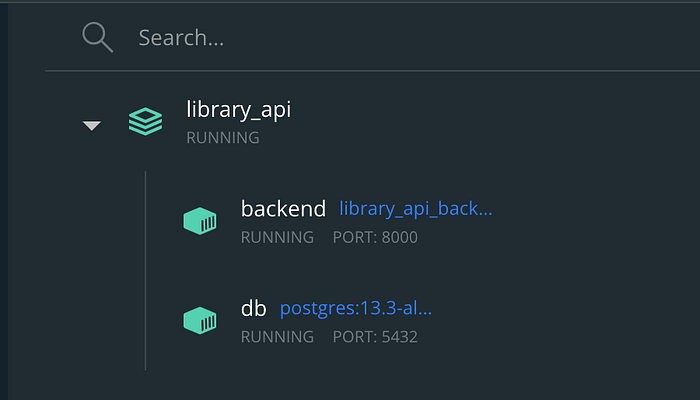
With Docker Desktop we can check the status of our containers:
Container logs are very useful for debugging what goes on inside our application. You can also check these through Docker desktop:
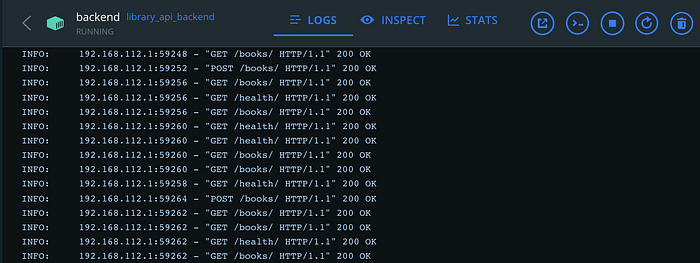
Similarly, we also log all SQL statements in our postgres container:
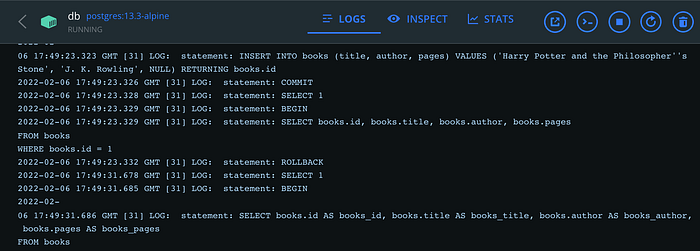
And if we want to interact with our local database directly we can also run:
docker exec -it db psql -h db -d test_db -U postgres
*Here the -h stands for host, -d stands for database and -U for user. We defined all of these in the .env file.
This will prompt us for the password, which we have also set as an environment variable in our .env file. We can then use the \dt postgres command to list all existing tables and check that our alembic migration script worked correctly:
Password for user postgres:
psql (13.3)
Type "help" for help.test_db=# \dt
              List of relations
 Schema |      Name       | Type  |  Owner
--------+-----------------+-------+----------
 public | alembic_version | table | postgres
 public | books           | table | postgres
 public | users           | table | postgres
(3 rows)
And that’s it! You should now have a working knowledge of how to interact with Docker containers as well as some background info on why teams use them. You can check Docker’s official documentation for more information on the different image instructions that are available. If you have an existing project, try to dockerize it and use some of the commands in this tutorial. Building something yourself is normally the best way of learning. Good luck!
